Hello there, we’re well and truly into October now and there’s a chilly damp feeling in the air, which means of course that Autumn is here. Whilst I love the colours and cosiness of autumn, I can’t help feeling a creeping dread about the cold, dark days which lie ahead, so I thought I’d better head those feelings off at the pass with a couple of crochet pals to keep me company….
Oakley & Agatha
Please allow me to introduce you to Agatha the Fly Agaric Mushroom and her woodland friend Oakley the Acorn Tree Sprite.
Agatha & Oakley have been with me for a while, they were bouncing around in my brain long before I set to work with a hook and yarn as is often the case with my little crochet folk. Back in early 2021 I drew up a list of lots and lots of little crochet people I would one day like to make – that list is still there, I’m maybe about an eighth of the way through it, but it keeps growing!!
Inspired by childhood fairy stories of flower fairies and tree sprites and funny little enchanted woodland people I have added Agatha the Fly Agaric Mushroom and Oakley the Acorn Tree Sprite to my Up the Garden Path collection of amigurumi crochet patterns. They have joined Flora the Gardener, Hope the Snowdrop, Cariad & Dave the Daffodils, Sophia Sunflower, Holly & Ivy and Daisy in the Up the Garden Path gang.
You may have spotted them before either on my Instagram or when we were out and about as they came with me to Yarndale last month for a trip out in my bag…
Some of the Up the Garden Path gang bound for Yarndale
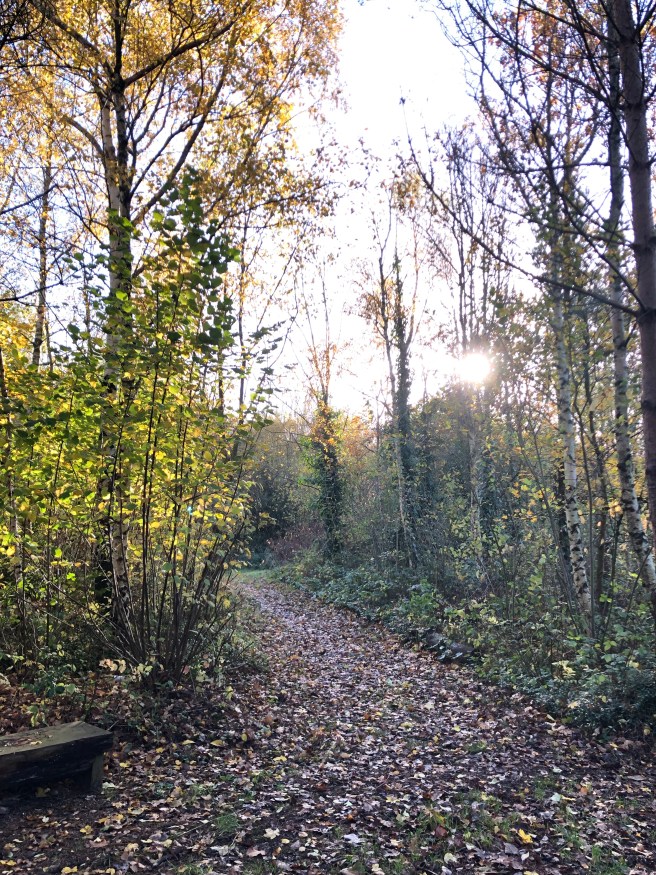
In fact the first photo in this post (and the next one) was taken just outside Skipton Auction Mart as I left Yarndale. I know for a fact a few people walked past while I was kneeling down in a pile of moss next to a hedgerow trying to get a decent photo of my little people. Nobody laughed out loud, but I’m sure a few of them must have thought I’d lost my marbles! I didn’t find them at the bottom of the hedgerow while I was down there by the way!! (My marbles that is) .
Oakley
So anyway, I just wanted to pop on and tell you about my two latest crochet creations. I can’t help but be inspired by the natural world, the colours and textures set my brain firing with ideas for new crochet creations, and regular readers of this blog will be well aware I love woodland walks, so what better than to combine two of my favourite things; trees & woodlands with crochet?
Agatha
There’s something intensely satisfying about trying to figure out how to engineer the different parts of my Up the Garden Path gang. It might come to me straight away or it may take weeks or even months as I shove a part-made project away in a bag because I can’t figure something out… (I’m currently working on another autumn themed little person who has just come out of hiding in a project bag – will I get her finished in time for this autumn or next? And don’t even get me started on my Christmas project which was due to see the light of day nearly 12 months ago!!).
If you would like to have a go at making an Agatha or Oakley of your own, you can find the patterns for sale on my Etsy Shop they can be bought individually or in a bundle of two which works out a bit cheaper.
If you do decided to have a go at making one or both of them, please do share a photo with me as I’d love to see them. If you tag me on Instagram or use the hashtag #upthegardenpathagatha, #upthegardenpathoakley or #makingstitchescrochet I should be able to see what you have made.
Sorry for the lack of postcard from June – it was a very hectic month with exams and school stuff in our house – very little of it photo worthy so I opted to tag a bit of June in with July’s postcard. So here goes…
Garden news
My front door pots
One of the joys of having a postcard from two months is that I can share the progress of my garden in that time. Last month I set about planting up two new pots to live either side of my front door – they looked a little sparse to begin with but blimey look how they’re doing now!
Also I love agapanthus, I have tried many times over the years, both in the UK and Gibraltar, to grow them but with rather lack lustre results. This year though, I was given some established plants by my parents who were thinning out their substantial agapanthus patch. Just look at these beauties – I didn’t expect them to flower after being disturbed and moved to my garden!
Football, football, football…
The calm before the chaos!
June was super busy for us with football. Our local club hosted two weekends of tournaments, youngest played in one of the home tournaments then another elsewhere the next week. The money raised from staging the tournaments, to which teams from across the North West of England come, means that they are able to keep the joining fee for young players affordable – some teams I have heard of charging literally hundreds for kids to join!
I was on bacon butty duty for some of it. I could still smell the bacon days later 😂.
From grass roots to top of the tree! Earlier this month I was lucky enough to take number 2 and number 3 sons to Old Trafford to watch the opening game of the Womens Euros – England against Austria.
Wow! What an atmosphere and their first game at Old Trafford. I’m so pleased I was able to do this and now they can say they were there at the start of the Lionesses Euros journey!
And then down to earth with a bump!
Nothing like sitting in a puddle on a deckchair on a very wet Sunday afternoon watching your 11 year old play! Utterly saturated!! We dried out eventually!
School play
Youngest’s school were able to put on their first school production in 3 years this year. Someone caught wind that I could sew so I was drafted in on the costume making. It was gorgeous fabric – rather like the type you would use for a wedding dress or bridesmaids dress which the school had been gifted. It was lovely to sew but not quite big enough for what they wanted… two cloaks with hoods. Sadly there wasn’t enough for the hoods and one sleeve was made of a patchwork of 5 different pieces but I got there in the end!
Foxy Loxy
We have a few neighbourhood foxes and they are so cheeky! Since we moved here 2 years ago I have encountered one or more on my evening strolls but blimey this one was cheeky. I was walking home one evening and stopped in my tracks when I caught sight of this cheeky money stretched out at my neighbour’s driveway! He / she sat there quite happily looking straight at me as I took photos and then vanished!
Crochet news
There have been a couple of crochet pattern releases since my last monthly postcard. Daisy (above) is my most recent floral inspired pattern and the pattern has yet again been illustrated by my very talented childhood friend Emma Jackson. She was inspired by the daisies popping up on my lawn!
Next up was my ‘School days’ pattern which was prompted after I made a couple of crocheted school children for Youngest’s school summer fair along with a load of crocheted friendship bracelets.
I thought that maybe someone else might like to make a school child for their local school’s fundraising efforts or for a young person who’s about to begin their own school adventure soon.
It’s been a busy couple of months for Making Stitches Podcast. There have been 5 episodes released in June & July. Clockwise from the top left of the photo above there was Joanne Scrace from The Crochet Project, Kitey aka The Yarn Whisperer, Sally Wilson from Caterpillar Cross Stitch, Emma Munn from Emma Knitty and finally Christine Perry aka Winwick Mum and Juey from Juey Jumbo Craft Tools.
You can listen back to any of the episodes by searching for Making Stitches on your favourite podcast app or via this link.
And that just about brings this latest postcard to a close. I hope June & July we’re kind to you and your August is going well too. The tension levels are rising in our house as the dreaded A-Level results day draws nearer…. Eek!
Hello there! Please allow me to introduce the newest member of the Up the Garden Path gang – Daisy.
Did you make daisy chains as a child? It’s something I always liked to do during the summertime – if I could find any…. you see my Dad was very proud of his garden (he still is to be fair) and rarely did he allow the grass to get long enough to allow daisies to appear in the lawn. Most of my daisy chain making was reserved for playtime on the school field or the occasional trip to a field or meadow.
But despite that, daisies always mean summer to me. Way back in the very early days of Postcard from Gibraltar, in July 2015 on one of our family trips back home to Manchester from Gibraltar during the school summer holidays I blogged about a lovely family outing we made into the Cheshire countryside. Amongst the delights on offer that day were a woodland walk, a picnic, creamy Cheshire ice cream and, you guessed it, a daisy chain. Living in Gibraltar at the time, there was very little access to ‘real’ grass due to the climate, and certainly no daisies, so they were a bit of a novelty.
You can find that blog post about Daisies and Damselflies here .
Fast forward to last year and we were enjoying our first summer in our new home in Manchester and what should pop up through the blades of grass in our new back garden lawn than a small but very welcome crop of daisies? As I was already in the mindset to try and turn any floral inspiration I found in my garden into something yarny and specifically amigurumi, there was absolutely no question that I had to make a daisy inspired doll.
Fortunately I had some yarn in my stash which fitted the bill perfectly for the job – a couple of balls left over from making Hope the Snowdrop and some yellow which had been bought with daffodils in mind (do you remember them?) and I was able to crack on pretty much immediately. Before long Daisy was beginning to take shape.
Hope the Snowdrop and Cariad & Dave the Daffodils
I actually had another inspiration for my Daisy too, she was a lovely lady who was full of fun and involved in everything going – my Great Aunt Daisy. Although not her actual name, she was known as Daisy from being young and was always Aunt Daisy to me.
She lived on the west coast of Scotland in a tiny little village, which although small, made up it for with a sense of community and boy did she squeeze every ounce of fun out of that community. She was involved with so many groups and events from country dancing to women’s groups. Sadly no longer with us (she would have been well over 100 if she was still around today) I initially set out on my Daisy crochet adventure with Aunt Daisy in mind.
I had thought to give her white hair and glasses befitting of a village elder, but this Daisy is youthful and no less great for it. I imagine she is never one to say no to turn around the dance floor and ready to squeeze every last ounce of fun out of life.
Yet again, my pattern is based on the amigurumi technique of crocheting in the round and is in UK crochet terms. It comes in a beautifully produced and illustrated version (thanks to my wonderfully talented childhood friend Emma from Emma Jackson Art) and a text-only printer friendly version too for those who prefer to work from paper patterns and perhaps scribble notes in the margins (like me). The Daisy pattern has been launched on my Etsy shop today and is available for immediate download.
Emma’s beautiful illustration of Daisy
I hope this inspires many Daisies to be made and that they all bring that same sense of fun with them out into the world. If you fancy capturing a bit of summer meadow or lawn which will last all year long you know what to do.
She’s a perfect project for stash busting – just four colours are required and she’s made using simple stitches which would be great for beginners.
You can find the pattern for sale in my Etsy shop which you can get to via this link.
Thank you so much for stopping by, and if you do make a Daisy of your own, please do let me know by either tagging me in on social media, use the hashtags #upthegardenpathdaisy or #upthegardenpathcrochet , or just send me a message to tell me – I would love to see where any Daisies start springing up!
Hello there and happy St David’s Day! March 1st seems like the perfect day to share with you my latest crochet pattern; for Dave the Daffodil. Dave is one half of a daffodil couple – Cariad & Dave – a beautiful illustrated pattern for them both will be available in my Etsy shop very soon, but a basic version of Dave can be found for free below.
When I first started creating my ‘Up the Garden Path’ amigurumi people last year, I was very much guided by the seasons, beginning with Hope the Snowdrop (who’s also available in my Etsy Shop) and Saffron the Crocus and then Dave and Cariad made an appearance.
Cariad & Dave
If you would would like to have a go at making your own Dave, here’s how to do it:
Dave is made using the Amigurumi technique of crocheting in the round, so a stitch marker is a must for marking the first stitch of every round, so you can follow where you are up to in the pattern. I also made him using a 2.5mm hook which makes the fabric nice and tight and there’s no chance that you will see the stuffing poking through between the stitches and rows.
Materials I used:
Face, hands, feet and hair – I used a dark beige to pick up on the colours of the papery cases around the buds of daffodil blooms a similar yarn is Ricorumi Shade 56 – Nougat
*I prefer a neater finish for my decreases in amigurumi which can be achieved using an invisible decrease rather than Dc2Tog. To make an invisible decrease, you put your hook through the front loop only of the next two stitches, yrh and pull it back through.
The Pattern:
As Dave is crocheted together as you go, you will need to make his head, arms and legs first before attempting the body. His hair, cloak and crown and can be made later. The figure in brackets at the end of each row/round indicates how many stitches there are in that round e.g. (6). Please remember to use a stitch marker in the first stitch of every round so that you can keep track of where you are.
Head(Begin Dave’s head with Yellow yarn and work the first 8 Rounds in Yellow before changing to Nougat /dark beige in the final YO of Round 8) :
Round 1 With yellow yarn, work 6 Dc into a MC and pull tight (6)
Round 2 2Dc into every stitch around (12)
Round 3 (2Dc into next st, 1Dc into next st) repeat around (18)
Round 4 (2Dc into next st, 1Dc into next 2 sts) repeat around (24)
Round 5 (2Dc into next st, 1Dc into next 3 sts) repeat around (30)
Round 6 (2Dc into next st, 1Dc into next 4 sts) repeat around (36)
Round 7 (2Dc into next st, 1Dc into next 5 sts) repeat around (42)
Round 8 (2Dc into next st, 1Dc into next 6 sts) repeat around . Change to Nougat yarn in final YO of round 8 (48)
Rounds 9-16 1Dc into every stitch around (48)
Round 17 (Dc2tog [or invisible decrease as detailed previously], 1Dc into next 6 sts) repeat around (42)
Round 18 (Dc2tog, 1Dc into next 5 sts) repeat around (36)
Round 19 (Dc2tog, 1Dc into next 4 sts) repeat around (30)
Round 20 (Dc2tog, 1Dc into next 3 sts) repeat around (24)
Round 21 (Dc2tog, 1Dc into next 2 sts) repeat around (18)
Fasten off and break yarn leaving a long tail to sew the head onto the body later on. Place the safety eyes between Rounds 11 & 12 and 4 stitches apart. Stuff head firmly.
Arms (make 2): (Note: Change to green yarn on the final YO of round 6 and work the rest of the sleeve in green.)
Round 1 With Nougat/dark beige yarn, work 6Dc into a MC and pull tight (6)
Round 2 2Dc into every stitch around (12)
Rounds 3-25 1 Dc into every st around, ensuring you change to green yarn in the appropriate round as detailed above. (12)
Fasten off and break yarn. Darn in the yarn tail and stuff lightly.
Legs (make 2): (Note: Change to green coloured yarn in final YO of round 10.)
Round 1 With Nougat/dark beige yarn, work 6Dc into a MC and pull tight (6)
Round 2 2Dc into every stitch around (12)
Round 3 (2Dc into next st, 1Dc into next st) repeat around (18)
Round 4 (2Dc into next st, 1Dc into next 2 sts) repeat around (24)
Rounds 5-8 1Dc into every st around (24)
Round 9 (Dc2tog, 1Dc into next 2 sts) repeat around (18)
Rounds 10-14 1Dc into evert st (18)
Round 15 (Dc2tog, 1Dc into next 4 sts) repeat around (15)
Rounds 16-42 1Dc into every st around (15)
Fasten off and break yarn. Darn in the yarn tails and stuff the legs firmly.
Dave’s Body
Round 1 With Olive Grove Green yarn, join yarn in the first stitch after fastening off on the first leg. Ch1 and 1Dc into the same st, then 1Dc into next 9 sts. Ch1 and join 2nd leg by making 1Dc into 1st st after fastening off on the 2nd leg. 1Dc into all remaining sts on 2nd leg, 1Dc into the front loop of the connecting chain, 1Dc into the remaining sts of the first leg. (32)
Round 2 1Dc into every st around including both sides of the connecting chain. (32)
Round 3 1Dc into next 2 sts, 2Dc into next 2 sts, 1Dc into next 14 sts, 2Dc into next 2 sts, 1Dc into next 12 sts. (36)
Rounds 4-24 1Dc into every st around. (36)
At this point flatten out the top of the body so you can clearly see the 2 sides where the arms should go. Mark the sides with stitch markers to see the midpoint of each arm position. We will be attaching the arms in Round 25.
Round 25 work out the point which is 3 sts away from the nearest stitch marker, this is where you need to begin joining the first arm. 1Dc into every st until this point. Taking the first arm, put your hook through both the front and back sts on the right hand side of the top edge and then work 1Dc into the next st on the body. Continue to attach the arm in this manner until all 6 sts across the top of the arm are attached to the body. 1Dc into the next 12 sts across the front of the body, then attach the second arm in the same manner into the next 6 sts, 1Dc into the remaining st of round 19. (36)
Round 26 1Dc into every st until the st above the beginning of the 1st arm join in Round 27, Dc2tog, 1Dc into next 2 sts, Dc2tog, 1Dc into next 12 sts, Dc2tog, Dc into next 2 sts, Dc2tog, 1Dc into the remaining unworked sts of Round 25. (32)
Round 27 1Dc into every st until the st above the first decrease of the previous row, Dc2tog, 1Dc into next 2 sts, Dc2tog, 1Dc into the next 10 sts, Dc2tog, 1Dc into next 2 sts, Dc2tog, 1Dc into the remaining unworked sts of Round 26. (28)
Round 28 1Dc into every st until the st above the first decrease of the previous row, Dc2tog, Dc2tog, 1Dc into next 10 sts, Dc2tog, Dc2tog, 1Dc into remaining unworked sts of Round 27. (24)
Round 29 1Dc into every st until the st above the first decrease of the previous row, Dc2tog, Dc2tog, 1Dc into next 8 sts, Dc2tog, Dc2tog, 1Dc into remaining unworked sts of Round 26. (20)
Fasten off and break yarn leaving a long enough tail to sew the head on.
Firmly stuff the body. At this point, position the head with eyes facing forwards on top of the body, pin in place and sew the head onto the body securely.
Dave’s outer daffodil petals (Make 6)
Round 1 With Yellow yarn, 6Dc into a MC and pull tight (6)
Round 2 (2Dc into next st, 1Dc into next 2 sts) repeat (8)
Round 3 (2Dc into next st, 1Dc into next 3 sts) repeat (10)
Round 4 (2Dc into next st, 1Dc into next 4 sts) repeat (12)
Round 5 (2Dc into next st, 1Dc into next 5 sts) repeat (14)
Round 6 (2Dc into next st, 1Dc into next 6 sts) repeat (16)
Round 7 (2Dc into next st, 1Dc into next 7 sts) repeat (18)
Round 8 (2Dc into next st, 1Dc into next 8 sts) repeat (20)
Round 9 (2Dc into next st, 1Dc into next 9 sts) repeat (22)
Rounds 10 – 13 1Dc into every st around (22)
Round 14 (Dc2tog, Dc2tog, 1Dc into next 7 sts) repeat (18)
Round 15 (Dc2tog, 1Dc into next 7 sts) repeat (16)
Fasten off and weave in ends.
Dave’s Crown
Round 1 Once all 6 petals are complete, they need to be joined together to make Dave’s Crown. Take the first petal and put the hook through both the front and back sts on the right hand side of the top edge and pull a loop of Yellow yarn through, Ch1 then 1Dc into this same st, 1Dc across the remaining 7 stitches (both front and back sts) of the first petal. Then take the 2nd petal and work 1Dc across all 8 sts (both front and back sts) and continue in this manner until all 6 petals are joined with a row of Dc sts then slst. (48)
Round 2 We want Dave’s crown to be worked in the round, so the first st of Round 2 is worked into the 1st st of Round 1 which will connect the whole row of petals into a circle – remember to make this first stitch of the next Round with a stitch marker. 1Dc into every st around (48)
Round 3 (Dc2tog, 1Dc into next 6 sts) repeat around (42)
Round 4 Working into the FLO (Dc2tog, 1Dc into next 5 sts) repeat around (36)
Rounds 5-12 1Dc into every st around (36)
Round 13 (Htr, Tr, Htr, Slst) repeat around to form frill on top of the inner trumpet of Dave’s Daffodil Crown. Finish off and break yarn. Weave in the end so that it’s invisible on both the inside and outside of the trumpet.
Then with yellow yarn, stitch the outer petals to each other at their widest part so that they stand up around the trumpet.
Place the daffodil crown onto Dave’s head positioning it along the edge of the yellow circle on the top of Dave’s head. Pin in place and then sew it to the head using the rim of back loops formed in Round 4 which should marry up with the edge of the yellow circle.
Dave’s Hair
Row 1 With Nougat yarn, Ch 40. (1Dc into 2nd ch from hook and the next 4 chains. Stst into next ch & ch6) repeat along to the end of the chain until you have 35 strands of hair. Once you rech the end of the row, ch1 and turn.
Row 2 1Dc into every st along, Ch1 and turn (33)
Row 3 Slst into the next 3 sts, Dc2tog, Dc2tog, Dc2tog, 1Dc into the next 3 sts, Htr into next 2 sts, Tr into next 5 sts, Htr into next 2 sts, 1Dc into next 3 sts, Dc2tog, Dc2tog, Dc2tog, slst into next st and finish off leaving a log tail to attach hair to Dave’s head. Sew the hair in place just below the crown.
Dave’s cloak
Row 1 With Olive Grove green yarn ch 52. 1Tr in 3rd chain from hook and each subsequent chain. Ch1 and turn. (50)
Row 2 Slst into next 36 sts. Ch 18 and turn.
Row 3 1Tr into 3rd ch from hook and 15 remaining chains. 1Tr into the next 36 sts. Ch1 and turn (52)
Rows 4 Repeat Row 2
Row 5 Repeat Row 3
Row 6 Repeat Row 2
Row 7 Repeat Row 3
Row 8 Repeat Row 2
Row 9 Repeat Row 3
Row 10 Repeat Row 2
Row 11 Repeat Row 3
Row 12 Repeat Row 2
Row 13 Repeat Row 3
Row 14 Slst into next 36 sts. Chain 16 and turn.
Row 15 1Tr into 3rd ch from hook and 13 remaining chains. 1Tr into the next 36 sts. Ch1 and turn the cloak at right angles to begin working along the top edge.
Row 16 begin the first row of the cloak collar by working 1Dc into the end of the first row and 2Dc around the 1st Tr of the first row. Repeat this along the top edge of the of the cloak. Ch2 and turn (25)
Row 17 Work 1Tr into each of the stitches of row 16. Fasten off and weave in the ends.
Now take the yellow yarn and join it in one side of the cloak where the collar joins the main cloak and ch12 to bring a fastening across the front of the cloak and then secure it into place on the other side of the cloak once it is around Dave’s neck.
Cariad & Dave
If you make a Dave of your own, I’d love to see him! Please tag him on your social media posts with #upthegardenpathdave so I can see him.
Hello there! It’s the last day of November already eek! I’m not ready for December!!
It’s been a busy old month – perhaps that’s why it’s gone so quickly. It’s only now I look back at what we’ve been up that I’ve realised it’s been quite a lot.
In the latest twist of the Covid story it’s also been a month of regular trips to our local testing centre every time anyone gets a cough or sniffle or we are alerted about a close contact. I think we may have been about 10 times lately – I’m thinking of asking for loyalty points!! Fortunately all tests have come back negative.
Here’s what we’ve been up to this month…
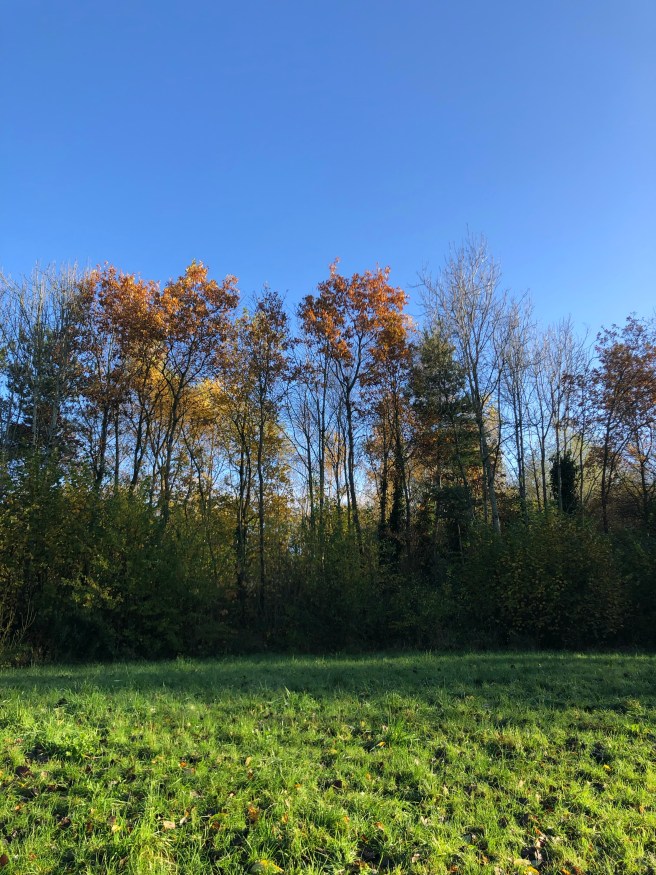
A golden tree at the end of the rainbow
Yet again this year, after over a decade away from the UK I have loved seeing the beautiful colours of autumn this month. I may no longer have little people at home who like to make pictures out of autumn treasure, but I can’t help but pick up pretty leaves when I see them!
No it’s not Christmas yet!!
Eek – am I the only one who gets freaked out by early Christmas decorations? I took Littlest out for hot chocolate on 1st November to a local café and they had a huge tree, giant baubles… the works! On the first of November!!! Maybe I’m just a Scrooge but it’s seems a bit early to me. This photo was of the Trafford Centre on the first Saturday of November…. Christmas lights galore!
Meeting real people in real life!
One evening early in the month, I had the most wonderful time ‘out out’ in Manchester. Since February/March last year I have been a virtual member of a super community for podcasters.
After months and months of zoom virtual meet ups where we hear from real ‘professional’ podcasters and swap advice and help amongst our community, I actually got to meet everyone in real life!! What a thrill. (People were so much taller than I expected after spending so long just seeing them on my phone/laptop screen 😂! )
The occasion for this meet up was to celebrate the club’s 3rd birthday and the 30th meet up in total. There were drinks and even birthday cake!
If you are a podcaster yourself or are thinking of starting your own podcast do come along to a future zoom. The group’s called MIC’s Podcast Club and although it’s based in the North West of England, there are members from much further afield (like America) and I was still living in Gibraltar when I first joined. You can find them on Twitter @MICsPodcastClub and maybe one day you can have the thrill of seeing your own podcast up in lights on the wall of a real-life meet up!
Costa del Ship Canal
Littlest’s football match got cancelled one week and instead the team coach opted to run a team building training session in our local nature reserve.
It was a perfect morning for it – definitely worth setting the alarm for an early start on a Saturday!
Just look at those blues and the golden leaves….
That water almost looked Mediterranean – well almost – it is the Manchester Ship Canal!
Plastic hedge be gone!
In this era of everything needing to look perfect and be convenient, we end up with situations like astroturf and plastic hedges. I am not a fan at all. I’m a bit more slap dash and enjoy going with the flow with nature, plus I really enjoy gardening. So when we inherited this delightful plastic hedge at our new home last year, it’s days were numbered. It did a lot better than expected as other jobs took precedence but this month, it’s time was up.
It didn’t take long, it was so rotten inside it practically fell apart – very little force was needed at all. I’m looking forward to installing a rather more environmentally friendly replacement soon!
Yorkshire Sculpture Park
A few weeks ago I received a message from a lovely friend I used to know in Gibraltar. She, like me has moved back to the UK and is now based in the South East of England. She wanted to let me know she and her partner were having a few days up North and would I like to meet them at the Yorkshire Sculpture Park? Yes! Was my answer!!
Barbara Hepworth sculptures
Before we moved to Gibraltar, we lived in Wakefield just a stone’s throw from YSP and it was a regular destination for us as a family on a weekend. It was so lovely to be able to go back there – albeit briefly while the Little Postcards were at school.
Ai Weiwei’s Chinese Horoscope Characters
The weather was so kind to us. It was very cold but it was beautifully sunny. The perfect conditions for having a wander through the beautiful park and sculptures.
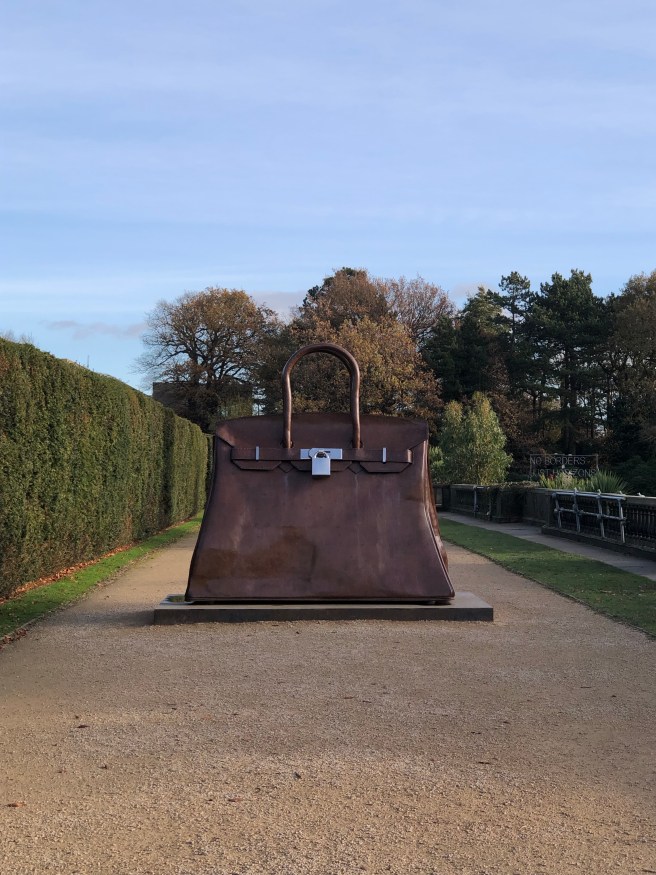
Close-up of one of Ai Weiwei’s Chinese Horoscope headsYou can never have a big enough hand bag!A Diamond ring made out of car wheels!
We didn’t spend too long together as I was clock watching to get back across the Pennines in time for school pick up, so we didn’t get to see the whole of the park but one exhibition both myself and my friend (who’s also a crafter) enjoyed immensely was one by Joana Vasconcelos who likes to create amazing things out of everyday objects… like giant stilettos out of pots and pans…
…. Lots and lots of crochet!!! Viva crochet!
Just look at that intricate work!!
Close-up of the above statueAnimal heads enrobed in intricate crochet
But the next fabric structure stopped us in our tracks… it was huge!
The photo doesn’t do it justice – it was giant and filled the huge exhibition space. It was a combination of patchwork, embroidery and very complicated crochet.
The photo above shows the end of one of those tentacles and was over a metre in diameter.
There were also pictures made of bulbous crochet structures…
Finisterra 2018Close-up of above pictureHeartbreak 2015
How about this for a giant pouffe for your living room?
There was also a sculpture made purely of red plastic knives & forks..
Red Independent Heart #3
And then more examples of intricate crochet covering everyday household items…
A double sinkDetail of the sink piece aboveA urinal called ‘Purple Rain’
And a fabulous chair…
The back of the chair above
The Joana Vasconcelos exhibition is on until 9th January 2022 both in the underground gallery and with pieces in the open air too. The artist’s work is said to be “sculptures that comment with a feminist perspective on cultural identity and tradition and celebrate the creative lives of women” – YSP Guide.
It was a lovely visit to the YSP and fabulous to be able to see my friend again – who I hadn’t seen since pre-Covid times. I can highly recommend a visit if you haven’t been, I’ll certainly be back when I can spend longer there.
Sock knitting update
Remember the pair of socks I was knitting thanks to Christine Perry aka Winwick Mum’s fabulous book?
Well they’re finished!!
Knitted using the Winwick Mum Basic Sock Pattern in West Yorkshire Spinners 4ply in ‘Brightside’ also designed by Winwick Mum
I now have toasty warm toes!
In other crafty news, I’m currently working on Eleonora from Coastal Crochet’s Winter Walk Scarf CAL.
It took a while to get started as my hand-dyed skein I’d been saving for the right moment got into rather a big tangle…
But I got there in the end…
And I’m on my way!
Making Stitches Podcast
In podcast news, there have been 2 new episodes this month – both of them yarn inspired.
Emma Leith (photo credit: Emma Leith Atelier)
The first was with the hugely talented and inspiring crochet designer Emma Leith. You can find that here.
Sara Mulvey from Black Sheep Wools (Photo credit: Black Sheep Wools)
The second was a real treat to record because it meant I was able to go ‘back stage’ at the fabulous Black Sheep Wools Craft Barn and speak to Sara Mulvey. What a joy it was to have a proper chat with Sara after months of watching her videos through lockdown – it was such a positive part of a rather unpleasant time. You can listen to Sara’s episode here.
And finally…
My first ever crochet patterns have been launched and are available to buy from my Etsy Shop!
There’s Flora the Gardener and Hope the Snowdrop and all being well they will be joined by some more friends very soon!
And that’s just about it for this month. I hope November has been kind to you.
Thanks so much for stopping by!
Lindsay x
Edit: I forgot to mention the snow! We also has some of the white stuff fall in the last few days – super exciting even if it was very cold!!
Please excuse this flight of fancy, it may be lockdown isolation which is getting to me, or perhaps the home-schooling but my mind has wandered off into a fantasy land where my alter-ego Flora lives.
Flora lives for her plants and adores her garden…
She has all the gear (and no idea) and can’t wait for the spring flowers to fully appear once the snow and frosts have passed. Flora is like a tightly coiled spring ready to burst into action once winter loosens its grip on her new garden.
After years spent living abroad without a proper garden to call her own and all that time spent watching Gardeners World from afar and dreaming of having a huge garden like Monty’s she now finds herself living in the suburbs with a rather smaller plot than ‘Long Meadow’ but it’s hers nonetheless.
What will this year have in store for her as she sees shoots of new life appear in her new plot?