Today I would like to share something very special with you. Recently, I was contacted by a lady called Emma who works for a very special organisation – the North West and North Wales Paediatric Transport service (NWTS).
The North West and North Wales Paediatric Transport Service transports critically ill children from their local hospitals to regional Paediatric Intensive Care Units for ongoing care. During Covid, when they were unable to have parents traveling in the ambulances with their children, they asked knitters to make matching hearts for the children and their families.
The team carry sets of three hearts – one for the child and one for each parent. The child receives their heart while the team stabilises them before the transfer, and the parents are encouraged to hold their hearts during this time. Before the transfer, the hearts are swapped over, so that each family member holds the other’s heart.
Emma explained that although this may seem like a little thing, it helps families feel connected at such a stressful time. The NWTS team has the goal of having 3 hearts to give to each family they work with, so their hearts remain together even if they cannot physically be together during the hospital transfer.
Currently, NWTS’s supply of hearts is running low and they are asking for help to boost their supply of yarny hearts. Emma contacted me to ask if she could share my amigurumi heart pattern for crocheters to use, naturally I said yes and asked if she would like me to spread the word about the appeal.
So here we go, if you have the time to hook up a trio (or multiple trios) of matching hearts for this very special cause, please do! You can find my little amigurumi heart pattern here. It’s a pretty small pattern which is perfect for using up little odds and ends of yarn and a teeny bit of toy filling to make it nice and plump. It works up very quickly, so you will have your hearts made in a jiffy! Also, if you are going to be joining me with my Summer Craft Challenge this year, these little hearts are the perfect palate cleanser mini project to slot in between your other wips.
“We would be incredibly grateful for help from anyone who enjoys crocheting, to create matched hearts for the children and their families. Our team carries sets of three hearts – one for the child and one for each parent. Right now, our supplies are running extremely low, and any contribution – no matter how small – would be deeply appreciated. The goal is to provide three hearts for each family: one for the child and one for each parent, so their hearts remain linked even if they cannot be together during the transfer” – North West & North Wales Paediatric Transport
When you have made your hearts, please send them to this address:
NWTS, Room 005, Newton House, Birchwood Park, Faraday Street, Risley, Warrington, WA3 6FW, United Kingdom.
If you do decided to make some hearts for NWTS, and you share them on social media, please use the hashtag #Hearts4NWTS so we can see all the beautiful hearts as they appear.
I would be so grateful if you would please help me spread the word about this yarny heart campaign to help make a very difficult time a little bit easier for poorly children and their parents.
Hello there, sorry for the slight delay in getting this square out to you. This month I could’t decide which design to go with so you have a choice, ‘Anyone for tennis?’ inspired by Wimbledon with a tennis ball centre and strawberry border, or, sticking with the strawberries, the Tutti Frutti version complete with an orange slice in the middle.
The only difference between the two squares is the central circle design and the colour choices for the rest of the square.
As always, I have made these squares using my own stash of Stylecraft Special DK yarns, I have included the numbers for the shades I have used below, but please use any yarn you like. It’s a perfect way of using up any small odds and ends you have left over from other projects.
Each square in the Making Stitches 2025 CAL is made to a similar basic pattern and should have 120 stitches in the final round to make joining the squares together at the end a little bit easier.
You will need:
Using Stylecraft Special DK
(A) Pistachio (1420)
(B) White (1001)
(C) Green (1116)
(D) Matador (1010)
(E) Clementine (1725)
(F) Jaffa (1256)
Size 4mm crochet hook
Scissors
Stitch Marker
Yarn Needle
Abbreviations (in UK terms): blo = work in back loop only, ch = chain, dc = double crochet, dc5tog = double crochet 5 sts together, dtr = double treble crochet, fyo = final yarn over, htr = half treble crochet, mc = magic circle / magic ring, fpdtr = front post double treble, rep = repeat, RS = right side, slst = slip stitch, st = stitch, tr = treble crochet.
‘Anyone for Tennis?’ Square
‘Anyone for tennis?’ square
Tennis ball
Using Yarn A, make a MC.
Round 1 Ch2 (not counted as a st throughout), 12 tr into MC. Slst into top of ch2 to close the round. Pull the central yarn tail tight to close MC. (12tr)
Round 2 Ch2, 2tr into every st around. Slst into the top of the Ch2 (24tr)
Round 3 Ch2, (2tr in first st, 1tr in next st) rep around. Slst into top of Ch2 (36tr)
Round 4A Ch1, in flo, (2dc in first st, 1dc in next 2 sts) rep around. Slst into top of ch1. Fasten off and break yarn. (48dc)
Then, using Yarn B, either surface crochet or embroider the wavy line onto the ‘tennis ball’.
Using Yarn C, join into the blo of one of the sts in Round 3.
Round 4B Ch1, (2dc in 1st st, 1dc in next 2 sts) rep around. Slst into top of Ch1. (48dc)
Round 5 Ch1, (2dc in 1st st, 1dc in next 3 sts) rep around. Slst into the top of ch1. (60dc)
Round 6 Ch1, (1dc in next 3 sts, 1htr in next 2 sts, 1tr in next 2 sts, 1dtr 2ch 1dtr in next st, 1tr in next 2 sts, 1htr in next 2 sts, 1dc in next 3 sts) rep around. Slst into top of the ch1. Fasten off and break yarn. (16 sts on each side = 64 sts)
Round 7 Join Yarn B into any st. Work 1dc into every st around and 1dc ch2 1dc into every corner space. Slst to top of 1ch. Fasten off and break yarn. (72dc)
Round 8 Join Yarn A into any st. Ch2, 1htr into every st around. Work 1htr 2ch 1htr into every ch space. Slst into top of ch2. Fasten off & break yarn. (80htr)
Round 6 completeRound 7 completeRound 8 complete
Round 9 Rejoin Yarn A into the 2nd last st before a corner, 2ch, 1htr in same st, and next st, (1htr 2ch 1htr into corner space, 1htr in next 2 sts changing to Yarn D in fyo of last st, work 5tr into next st changing to Yarn A in fyo of last st, 1htr into next 4 sts changing to Yarn D in fyo of last st, work 5tr into next st changing to Yarn A in fyo of last st, 1htr into next 4 sts changing to Yarn D in fyo of last st, work 5tr into next st changing to Yarn A in fyo of last st, 1htr into next 4 sts changing to Yarn D in fyo of last st, work 5tr into next st changing to Yarn A in fyo of last st, 1htr into next 2 sts) rep around until you reach the first st of the round and slst into to the top of the 2ch. (You should have 4 x 5tr clusters on each side and 18htr on each side).
Round 9 completeRound 10 in progressRound 10 complete
Round 10 Ch2, 1htr in the next 3 sts, (1htr 2ch 1htr into the corner space, 1htr into next 3 sts changing to Yarn C in fyo of last st, dc5tog changing to Yarn A in fyo, 1htr into next 4 sts changing to Yarn C in fyo, dc5tog changing to Yarn A in fyo, 1htr in next 4 sts changing to Yarn C in fyo, dc5tog changing to Yarn A in fyo, 1htr in next 4 sts changing to Yarn C in fyo, dc5tog changing to Yarn A in fyo, 1htr in next 3 sts) rep around until you reach the first st of the round and slst into the top of the 2ch. (20htr & 4 dc5tog on each side).
Round 11 Ch2 1htr into every st around working 1htr 2ch 1htr into every ch space. Slst into top of 2ch to close round. Fasten off and break yarn. (26 htr on each side = 104htr).
Round 12 Join Yarn B into any st. Ch1 and work 1dc into every st around, 1dc 2ch 1dc into every corner space. Slst into top of Ch1 to close round, fasten off and break yarn. (112 dc)
Round 13 Join Yarn C into any st. Rep Round 12. Fasten off and break yarn. (120 dc)
If you wish, you can use some Yarn A to sew the edge of the tennis ball flush to the square.
The Tutti Frutti Square…
July Tutti Frutti Square
If Tennis isn’t your thing and you fancy making a Tutti Frutti square inspired by cooling fruit juices, home grown strawberries or maybe even a tipsy fruit punch, here’s how to make one!
(The centre of the orange slice can be a bit fiddly, but I think it’s worth it to create clear segments for the orange.)
To make the orange slice
Using Yarn E, make a MC.
Round 1 Ch2 (not counted as a st throughout), 1tr into MC, changing to Yarn B in fyo, with Yarn B work 1tr into MC changing to Yarn E in fyo. Repeat until you have 6 orange tr and 6 white tr in the MC. Slst into top of ch2 to close the round. Pull the central yarn tail tight to close MC. (12tr)
Round 2 Rather thank working 2tr into every st around as in the tennis ball, in this round, we are making 3 tr into the orange sts of Round 1 and 1 fpdtr around the white tr sts in Round 1 to make the white pithy section stand proud of the orange segments. Work every st as described (3tr into each orange st & 1fpdtr around every white st) and slst into the top of the ch2 to close round. (24tr)
Round 1 completeRound 2 in progressRound 2 complete
Round 3 Ch 2 to begin. In this round, we are working 2tr into the first orange st of the segment , 1tr into the 2nd st, 2tr into the 3rd st of the segment changing to Yarn B with the fyo of the last st and 1fpdtr around the white st below from Round 2. Repeat around and slst into the top of the first 2ch to close the Round. (30tr & 6fpdtr).
Round 4 Join Yarn B into any st. 1ch, (2dc in the first st, 1dc in next 2 sts), rep around, slst into top of 1ch to close the round. Fasten off and break yarn. (48 dc).
Round 5A Work in the flo in this round. Join Yarn F into any st. 1ch, (2dc in flo of first st, 1dc in the next 3 sts), rep around. Slst into top of 1ch to close round. Fasten off and break yarn. (60dc)
Round 3 completeRound 4 completeRound 5A complete
To make the square:
Using Yarn A, join into the blo of one of the sts in Round 4.
Round 5B Ch1, (2dc in 1st st, 1dc in next 3 sts) rep around. Slst into the top of ch1. (60dc)
Round 6 Ch1, (1dc in next 3 sts, 1htr in next 2 sts, 1tr in next 2 sts, 1dtr 2ch 1dtr in next st, 1tr in next 2 sts, 1htr in next 2 sts, 1dc in next 3 sts) rep around. Sist into top of the ch1. Fasten off and break yarn. (16 sts on each side = 64 sts)
Round 5B in progress Round 5B complete Round 6
Round 7 Join Yarn B into any st. Work 1dc into every st around and 1dc ch2 1dc into every corner space. Slst to top of 1ch. Fasten off and break yarn. (72dc)
Round 8 Join Yarn A into any st. Ch2, 1htr into every st around. Work 1htr 2ch 1htr into every ch space. Slst into top of ch2. Fasten off & break yarn. (80htr)
Round 7Round 8Where to start Round 9
Round 9 Rejoin Yarn A into the 2nd last st before a corner, 2ch, 1htr in same st, and next st, (1htr 2ch 1htr into corner space, 1htr in next 2 sts changing to Yarn D in fyo of last st, work 5tr into next st changing to Yarn A in fyo of last st, 1htr into next 4 sts changing to Yarn D in fyo of last st, work 5tr into next st changing to Yarn A in fyo of last st, 1htr into next 4 sts changing to Yarn D in fyo of last st, work 5tr into next st changing to Yarn A in fyo of last st, 1htr into next 4 sts changing to Yarn D in fyo of last st, work 5tr into next st changing to Yarn A in fyo of last st, 1htr into next 2 sts) rep around until you reach the first st of the round and slst into to the top of the 2ch. (You should have 4 x 5tr clusters on each side and 18htr on each side).
Beginning of Round 91st side of Round 9Round 9 complete
Round 10 Ch2, 1htr in the next 3 sts, (1htr 2ch 1htr into the corner space, 1htr into next 3 sts changing to Yarn C in fyo of last st, dc5tog changing to Yarn A in fyo, 1htr into next 4 sts changing to Yarn C in fyo, dc5tog changing to Yarn A in fyo, 1htr in next 4 sts changing to Yarn C in fyo, dc5tog changing to Yarn A in fyo, 1htr in next 4 sts changing to Yarn C in fyo, dc5tog changing to Yarn A in fyo, 1htr in next 3 sts) rep around until you reach the first st of the round and slst into the top of the 2ch. (20htr & 4 dc5tog on each side).
Dc5tog in Round 10First strawberry top complete Round 10 complete
Round 11 Ch2 1htr into every st around working 1htr 2ch 1htr into every ch space. Slst into top of 2ch to close round. Fasten off and break yarn. (26 htr on each side = 104htr).
Round 12 Join Yarn B into any st. Ch1 and work 1dc into every st around, 1dc 2ch 1dc into every corner space. Slst into top of Ch1 to close round, fasten off and break yarn. (112 dc)
Round 13 Join Yarn A into any st. Rep Round 12. Fasten off and break yarn. (120 dc)
Working 1htr into top of dc5tog on Round 11Round 11 completeRound 12 complete Round 13 complete
And there you have it, a choice of two Making Stitches 2025 CAL squares for July. I hope you enjoy making them as much as I did!
If you do make one or both of these squares and want to share them online, please tag me in your social media posts using the hashtag #MakingStitches2025CAL and then I will be able to see them.
Thanks so much for joining me on this my first ever CAL, it’s been so much fun for me so far and so lovely to see some of my squares out there in the wild!
Hello there! And hello February! A new month can mean only one thing round these parts, and that’s a new square for the Making Stitches 2025 CAL.
Allow me to introduce you to the ‘All You Need is Love’ square! It’s a pretty straightforward pattern following a similar route as the January snowflake square. It begins in the round, forms a central motif and turns into a square later on.
I really couldn’t decide what colours to choose, so I went for all of them (almost)! This pattern is written following the same colours as this rainbow themed square below, but it can be created using as few as 2 different shades of yarn. I can’t wait to see what colours everyone uses when some February squares get shared on social media!
Making Stitches 2025 CAL February All You Need is Love Square
Are you ready? Well here goes….
2025 CAL Part Two: February – All You Need is Love Square
When trying to think of something to feature in February’s square which was connected to the month in question, I did consider a few options, snowdrops, camellias even, but I am afraid the hearts won out. This square is inspired by love, love for the special people & things in our lives, family, friends, partners, pets & even crochet! So please forgive me for opting for the obvious solution for February, however I didn’t necessarily mean to celebrate romantic love and St Valentine’s Day, but love in general – it’s a wonderful thing you know.
This pattern is meant to be a stash buster project however, if you would like to use the same yarn as I did, here’s what I used to make this square: Stylecraft Special DK in (A) Matador (1010) for the central heart motif, (B) Silver (1203) for the background colour, (C) Graphite (1063), (D) Citron (1263), (E) Clementine (1853), (F) Violet (1277), (G) Aster (1003), (H) Grass Green (1821).
I also used a 4mm crochet hook, scissors, stitch markers, and a yarn needle.
Abbreviations (in UK terms): blo = work in back loop only, ch = chain, dc = double crochet, dtr = double treble crochet, flo = work in front loop only, fyo = final yarn over, htr = half treble crochet, mc = magic circle / magic ring, MHC = Mini Heart Cluster (see NOTE below), rep = repeat, slst = slip stitch, st = stitch, tr = treble crochet.
Tension: Tension isn’t important for this project as long as you maintain the same tension throughout the project so all your squares are the same size. Once blocked this square will measure approximately 20cm x 20cm. The stitch count of the final round of each finished square will be 120 plus corner chain spaces.
NOTE: To make a ‘Mini heart cluster’ or an ‘MHC’ miss the next st in the round, and work str 2ch 2tr into the following st ie: [2tr + 2ch + 2tr]. To make a smooth colour change, change to the colour of the heart in the final yarn over of the previous st and change back to the background colour with the final yarn over of the last tr of the cluster. Remember to leave the its immediately before and after the mini heart cluster unworked so the cluster can spread open like a heart.
You can make the square in a variety of colourways
[To be clear; working in the front loop only, make 1slst & 1tr into 1st st, 4dtr into 2nd st, 2tr into 3rd st, 2htr into 4th st, 2dc into 5th st, 1htr + 1tr + 1dtr + ch2 + slst into 1st ch all worked into 6th st and so on around the 12 front loops of Round 1]
Round 2B In blo of Round 1, 2dc into every st around marking 1st with a stitch marker so it’s easy to spot when you reach the end. Slst into top of first st. Fasten off and break yarn. (24 dc)
Round 3A [This is the 3rd & final Round of the heart motif] Rejoin Yarn A into the top of 1st st of Round 2A. In next st make 2tr, then 3tr, 2tr, 2htr, 1htr + 1dc, 1dc in next 8 sts, 1dc 2ch slst into 1st ch 1dc, 1dc in next 8 sts, 1dc + 1htr, 2htr, 2tr, 3tr, 2tr, slst. Fasten off and weave in the end.
Round 3A
Square
Round 3B Join Yarn B into any st of Round 2B and ch2 (does not count as a st) 2tr, 1tr rep around. Slst into top of ch2 to close round. (36 tr)
Round 4 Ch2, 2tr, 1tr in next 2 sts around. Slst into top of ch2 to close round. (48 tr)
Round 5 Ch1, 2dc, 1dc in next 3 sts, rep around. Slst into top of ch1 to close round. Fasten off and break yarn. (60 dc)
Round 3BRound 4Round 5
Round 6 It’s useful to mark the first dc with a stitch marker so you know where to stop! Join Yarn B in the st directly above the centre of the heart. Ch1, 1dc in next 3 sts, (1htr in next 2 sts, 1tr in next 2 sts, 1dtr 2ch dtr in next st to form corner of square, 1tr in next 2 sts, 1htr in next 2 sts, 1dc in next 6dc) three times, 1htr in next 2 sts, 1tr in next 2 sts, 1dtr 2ch 1dtr, 1tr in next 2 sts, 1htr in next 2 its, 1dc in next 3 sts. Slst into top of first ch1 to close the round. (64 sts)
The start of Round 6 starting above the centre of the heartRound 6 completedRound 7Round 8
Round 7 Join Yarn C into any st, ch1, 1dc into every stitch around and work 1dc 2ch 1dc into each corner space. Slst into top of ch1 to close round. (Each side will have 18 sts – 72dc in total)
Round 8 Join Yarn B into any st, 2ch, 1htr into every st around working 1htr 2ch 1htr into each corner space. Slst into top of 2ch to close round. Fasten off and break yarn. (Each side will have 20 htr – 80 htr in total).
Weave in the ends and sew the heart into place onto the backing square using small stitches in Yarn A so they aren’t visible.
The starting point for Round 91st MHC made2nd HMC madeRound 9 complete with lots of ends to sew in!
Round 9 Join Yarn B in the last st before the top right hand corner, ch2 & 1htr into that st, 1htr ch2 1htr into the corner space. 1htr into next 3 sts changing to Yarn D with the fyo of 3rd htr, miss the next st and make a mini heart cluster by working [2tr + 1ch + 2tr] into next st changing back to Yarn B in fyo of 4th tr, miss next st, with Yarn B 1htr in next 3 sts changing to Yarn E with fyo of 3rd htr, make another MHC (the section in square brackets above) changing to Yarn B with fyo of 4th tr, miss next st, and with Yarn B work 1htr into next 3 sts changing to Yarn A with fyo of the 3rd htr, miss next st and work a MHC into next st, miss following st and work 1htr into next 3 sts, work 1htr 2ch 1htr into corner space and repeat the process down the left hand side of the square making your MHCs in Yarns F, G & H to follow the rainbow pattern. Once you reach the bottom edge of the square repeat the pattern as worked along the top edge and on the right hand side, repeat the pattern as worked on the left hand side. Slst into top of ch2 to close round (56htr &12 mini heart clusters).
If you don’t want to have multi coloured hearts around the border of your square you can use just one contrasting colour. Change between the background and the heart colour in the fyos as detailed above and catch the non-working yarn within your stitches to save breaking the yarn and having lots of ends to weave in later.
Round 10 Please read the instructions of this round before starting! Using Yarn B, ch2, 1htr into every htr around, and 1htr 2ch 1htr in each corner space. When you reach the sts above a MHC work 1ch to jump over the first 2 tr of the cluster, work 1dc into the ch space in the middle of the cluster and 1ch to jump over the 2nd 2 tr of the cluster before working 1htr into the htrs between the MHCs. Slst into the top of the first 2ch to close the round. (On each side: 16htr, 6ch & 3dc)
Making the 1dc into the ch space in middle of a MHCRound 10
Round 11 Ch1, 1dc around into every st and ch spaces above each MHC & working 1dc 2ch 1dc into each corner. Slst into top of ch1 to close the round. Fasten off and break yarn. (26 dc on each side and 104 dc in total)
All You Need is Love Square in Rainbow colour wayAll You Need is Love Square in a 2 tone colour way
Round 12 With Yarn C, join into any st, ch1 and 1dc into every st around, working 1dc 2ch 1dc into every corner space. Slst into top of first st to close round. (28dc on each side and 112 dc in total).
Round 13 Ch1 and 1dc into every st around, working 1dc 2ch 1dc into every corner space. Slst into top of first st and fasten off, weave in all the ends. (30 dc on each side ad 120 st in total).
It was so lovely over the past few weeks to see lots of January snowflake squares being texted to me from friends and appearing on social media. If you are joining in and making a February square, please do use the hashtag #MakingStitches2025CAL so I can see if any ‘All You Need is Love’ squares make an appearance!
It’s 25th October, so that means it’s 2 months to go to Christmas! Apologies for using the C-word so soon but there is a very good reason for it….
Earlier this year, I started a new job. It was working for FareShare Greater Manchester an organisation which rescues tonnes of good-to-eat food from going to waste and then redistributes it to over 200 charities and community groups across Greater Manchester who are feeding those who need it most. It’s a truly amazing place filled with amazing people. You may have heard about it back in the pandemic when Manchester United footballer, Marcus Rashford came along to help the operation here with his Mum.
Last year, FareShare Greater Manchester rescued almost 2,000 tonnes of perfectly edible food from going to waste with the help of more than 21,000 volunteer hours given by our amazing team of volunteer supporters. That food went to more than 300 charities and community groups across Greater Manchester, into parts of Derbyshire and Cheshire too and was the equivalent of 4.6 million meals which would have gone to landfill or some other form of waste management.
At a time when an increasing number of people are facing the difficult choice of whether to spend money on heating their homes or feeding themselves and their families, this work is needed more than ever.
I was so inspired by the things I see and hear about at work each day, that I wanted to do something special myself to help support that vital work, so I picked up my hook and yarn. I decided I had to make something food related and started thinking about Christmas food in particular. First I crocheted a sprout and perfected a design for it, then some pigs in blankets and before I knew it I had a whole crocheted Christmas dinner.
I then thought about what would be the classic Christmas decoration, and settled on a wreath. A wreath cover was made, the Christmas dinner was added and hey presto, the FareShare Festive Feast Wreath was born.
The next dilemma was how would I be able to make money for FareShare Greater Manchester with this wreath? It would take too long for me to make wreaths to sell, but I could sell the pattern and send the money raised from that to support the FareShare operation. So that is what I have done.
Supported very kindly by Jane Czaja, who has tech edited the pattern, and with the full support of FareShare Greater Manchester, I have launched the new pattern on sale in my Etsy shop today.
I would be so very grateful if you would help me spread the word about the FareShare Festive Feast Wreath on your social media channels and tell all your crocheting friends about it. I would, of course absolutely love it too if you would buy a copy of the pattern and make a wreath(s) yourself!
Thank you so much for your time and for your support in this, I look forward to seeing how much we can raise for FareShare Greater Manchester together!
Hello there! I hope the summer’s treating you well. I’m writing this sitting in an armchair overlooking the water and across to the Isle of Bute on the west coast of Scotland. The picture above shows how I started the week (on a walk in Cheshire) and how I ended it (on a ferry from Gourock to Dunoon). Just look at the colours in those two photos – they would make a fab blanket don’t you think?
Anyway, back to the challenge for this week…
Day 29 – Saturday 17th August
Day 29 meant just a little time for a bit of knitting & a beer after a fun day with friends including a visit to Manchester Art Gallery & one of the nicest pizzas I’ve ever eaten in Manchester city centre.
Day 30 – Sunday 18th August
Crochet while playing monopoly can be dangerous… like missing when someone lands on your property and they keep quiet about it…
Day 30 of my #SummerCraftChallenge2024 an evening of playing monopoly after a lovely day with friends including that walk in Cheshire I was telling you about before.
Day 31 – Monday 19th August
Back working on my #MagpieMAL this evening after work. Completed section 6 and attempted to begin section 7 but had too many people talking to me to be able to count stitches, so ended up frogging that bit. Shall wait for a quiet moment before trying again!
Day 32 – Tuesday 20th August
I realised as I was writing this post that although I did take this photo on Day 32 I forgot to post it on Instagram at the time – whoops! I did find that quiet moment I was seeking the day before and managed to restart that section I had to frog. Hurrah!
Day 33 – Wednesday 21st August
As of lunchtime on Wednesday, I was officially ‘on holiday’ hurrah!
I spent a very happy hour playing with my @stylecraftyarns Special DK stash in the afternoon, so I have a new WIP to play with while I’m away with my family on holiday.
I’m hoping this means I will be able to share a few more inspiring al fresco crochet and knitting photos while I’m away!
Day 33 of my #SummerCraftChallenge2024 completed in an array of colour! 🌈
Day 34 – Thursday 22nd August
Day 34 of my #SummerCraftChallenge2024 was mainly dominated by GCSE results in our house. I’m pleased to say it was good news – phew! Sending best wishes to everyone else who was involved in such things. It’s an emotional time whether they bring positive or negative news.
Aside from that there were Granny Squares a plenty and the start of a new WIP for my holiday project.
Day 35 – Friday 23rd August
I had a very happy half an hour knitting at the hairdressers getting my holiday hair cut and to hide the silver which keeps appearing.
Do you take your craft projects to the hairdressers? I always do. They’ve stopped asking if I want a magazine to read now as they know I always have something in my bag ready to whip out!
The Summer Craft Challenge 2024 at large!
My word what a creative week it’s been for those of you joining me with the Summer Craft Challenge this year. There’s been slow stitching, sock knitting, blankets and plenty and this stunning embroidery of summer 2024 memories!
I’m still so thrilled that I’ve got company on this creative wander through the summer and so it’s so inspiring to see such lovely work! Thank you all for joining in Marisa @mariwish, Sandra @wilddaffodilwild , Carol @nanaseamakes, Kristina @catsy_crochet, and Alison @alisonswoolnwalks.
If you’d like to join me with a little bit of creativity every day this summer, please do. Just take a photo of your moment of creative fun and upload it to Instagram using the hashtag #SummerCraftChallenge2024 – there are no rules, just fun! Post once, occasionally or everyday – it’s up to you!
That’s all for this week, I hope you’ e enjoyed my creative meander through the past seven days. I hope your week ahead is filled with fun & creativity!
As we approach 14th February, I thought maybe it would be nice to share a bit of crochet love.
This is a little pattern I have been working on and I thought I would share it with you. I’ve never been a huge fan of Valentine’s Day, so instead of it being all about the romantic kind of love, why not use it as a time to show someone special that they mean a lot to you?
So here’s my gift to you, a little amigurumi heart pattern for you to share with someone special or even to keep for yourself. Although, I have to admit, they come with a health warning – because once you start, it’s quite hard to stop! I have them in all colours around the house!
Enjoy spreading a little yarny love!
Lindsay x
You will need:
Yarn – I used Scheepjes Catona shade 390
Hook – I used a 2.5mm hook for this project *
2 Stitch Markers – place the stitch marker in the first stitch of every round and move it up on each round so you can keep track of where you are in the pattern.
Toy Stuffing
Yarn needle – to weave in the ends
* Whatever weight of yarn you use, I recommend using a hook one size smaller than the one recommended on the ball band to give a tighter fabric. For example if you use DK weight yarn which has a 4mm hook recommendation, I would use a 3.5mm for this project.
Note: This heart is made using the amigurumi technique of crocheting in the round. You will need to use a stitch marker to mark the first st of each round and keep moving it into the first st of each new round as you work.
Stitches and abbreviations:
This pattern is written in UK terms.
Dc = Double crochet
Dc2tog = Double crochet 2 stitches together to decrease *
MC = Magic Circle
Rep = Repeat
Slst = Slip Stitch
St(s) = Stitch(es)
I prefer to decrease by putting my hook into the front loop only of the next two stitches, yarn over hook and pull it back through.
The pattern:
We begin the pattern at the top of the heart and work downwards. This means that we need to make two separate ‘bumps’ for the top, which are joined in Round 7.
‘Bump 1’
Round1 Work 6Dc into a MC and pull tight (6)
Photo shows the MC pulled tightly.
Round 2 2Dc into every st around (12)
Round 3 [2dc, 1Dc into next 5 sts] rep (14)
Round 4 [2Dc, 1Dc into next 6 sts] rep (16)
Round 5 1Dc around (16)
Round 6 1Dc around (16) Fasten off and break yarn. Leave the SM in the first st of Round 6 so you know where to begin the join.
Don’t worry about weaving in any ends at this point as they will be hidden inside the finished heart.
‘Bump 2’
Repeat Rounds 1-6 of the first bump but do not break the yarn.
Once you have both ‘Bumps’ made, it’s time to join them together.
Round 7 Put your hook into the first st of the first ‘Bump’ after fastening off (marked with the SM – see photo above) – this will become the first st of this round so move the SM into this st once you have worked it. Work 1Dc into every st around ‘Bump 1’, then 1Dc into every st around ‘Bump 2’ (32)
Close-up of Round 7 in progress with SM in place to mark first st of this Round.
Round 7 continued… By keep both stitch markers in place, it helps you see where you need to work your next stitch after the join on the other side.
The end of Round 7.
Round 8 1Dc into every st around (32)
Round 9 1Dc into next 7 sts, Dc2tog, 1Dc into next 14 sts, Dc2tog, 1Dc into next 7 sts (30)
Photo shows Dc2tog by putting the hook through the front loops of the next two stitches in order to decrease the stitch count.
The end of Round 9.
Round 10 1Dc into next 6 sts, Dc2tog, 1Dc into next 13 sts, Dc2tog, 1Dc into next 7 sts (28)
Round 11 1Dc into next 6 sts, Dc2tog, 1Dc into next 12 sts, Dc2tog, 1Dc into next 6 sts (26)
Round 12 1Dc into next 5 sts, Dc2tog, 1Dc into next 11sts, Dc2tog, 1Dc into next 6 sts (24)
Round 13 1Dc into next 5 sts, Dc2tog, 1Dc into next 10sts, Dc2tog, 1Dc into next 5 sts (22)
Stop at this point and add some toy stuffing into the top of the heart.
Round 14 1Dc into next 4 sts, Dc2tog, 1Dc into next 9 sts, Dc2tog, 1Dc into next 5 sts (20)
Round 15 [Dc2tog, 1Dc into next 3 sts] rep around (16)
Round 16 [Dc2tog, 1Dc into next 2 sts] rep around (12)
Add some more stuffing at this point before the opening gets too small and stuff firmly.
Round 17 [Dc2tog, 1Dc] rep around (8)
Round 18 Dc2tog around (4)
❤️And there you have a little amigurumi heart!❤️
Fasten off and break yarn leaving a tail to stitch the point of the heart closed and weave in the end.
If you want your heart to have a hanging loop, make the tail long enough to be pushed up through the middle of the heart and sew into a loop.
If there is a hole at the top of the heart between the two ‘Bumps’ you can sew this closed with a stitch or two to hide the stuffing.
Ta-dah! One heart ready to be gifted or hung somewhere for everyone to enjoy!
Just be careful though…. before you know it, your house could be full of them!
❤️🧡💛💚💙💜
❤️🧡💛💚💙💜
If you make one of these amigurumi hearts, do please let me know, I would love to see some out in the wild! If you share a photo of your own heart creations, please tag me in on social media or use the hashtag #MakingStitchesHeart or #MakingStitchesCrochetPattern
The recent cold snap we’ve experienced in my part of the world reminded me that I’ve been meaning to write this post for weeks. I’ve been crocheting in earnest for well over a decade now making blankets, scarves, shawls, jumpers and a cardigan as well well as lots of little people. Despite that, I’d never made myself a hat. When it’s cold outside I always found myself reaching for the same shop-bought woolly hat I’d bought a long, long time ago. I decided that this winter it was time to put that right, and made not one, but two new hats!
My old hat in use at football training!
I scoured my collection of pattern books and magazines and happened upon this lovely granny stripe hat from the Modern Granny Stitch Crochet book by Claudine Powley also known as Iron Lamb. I had been wanting to have a go at one of her beautiful granny jumpers but with magazine commissions and a knitted jumper in progress, I’d parked that idea for a while. There was nothing stopping me making a hat though – it would be a quick project, almost like a palette cleanser between my commissions.
Fortunately I have a decent stash of yarn these days thanks to a couple of Scheepjes boxes of smaller balls which I have acquired, so I rooted through them to find the right colours for a hat – I wanted something bright and colourful to cheer up a grey day spent standing on the football sidelines cheering my youngest and his team on. I hit on this bright cerise pink and dark turquoise along with the pale grey. The pattern was really clear and quick to make up. I’m really happy with how it turned out – at last I had an alternative to my old shop-bought number!
However, I found that hats are a bit like buses – you wait for ages for one to come along and then another one arrives in quick succession! Just as I was finishing off my Iron Lamb creation I saw a beautiful pattern release by Catherine of Catherine Crochets – the Down the Line Beanie.
In case you haven’t come across Catherine before (although I am sure you probably will have) she is known for her beautiful tapestry crochet blankets and accessories. Catherine was my guest on Making Stitches Podcast – you can find that episode here.
My Yarn Whisperer hand dyed yarn 🩷
I had some beautiful hand dyed yarn in my stash which I bought a while back from the Yarn Whisperer (another of my podcast guests!). It’s called ‘4 of Wands’ and I just loved the rainbow effect it gives.
I had started using it in a knitted shawl project which, unfortunately for the shawl, was just too tricky for me so it was put in the naughty pile. I was feeling guilty that this lovely yarn was sitting unused, then I found the Down the Line Beanie pattern and I knew that this was the yarn for the job. The contrasting grey yarn was bought as a compliment colour to use in the tricky shawl project so I was ready to start as soon as I downloaded the pattern!
It was another really simple pattern to follow and despite appearing to be complicated – it was surprisingly easy. I really loved making it and just love the way the lines merge together as they reach the crown of the hat! Isn’t it pretty?
Then the huge decision – to pompom or not to pompom?
I hummed and hawed for a while, and finally decided it needed a pompom just to finish it off and to make full use of that gorgeous skein of hand dyed yarn – so thanks to a great freebie pompom maker from Simply Crochet magazine, I got winding and lo and behold, I had a pompom!
My completed ‘Down the Line’ beanie
I’m so pleased with how my two new hats turned out – I now have a choice of styles for when I’m heading out for a cold damp morning or evening standing on the football sidelines!
Thanks so much for stopping by! I hope you’ve enjoyed reading about some of my latest crochet adventures. If you would like to keep up to date with all my news, please sign up for my newsletter using this link.
Until next time, take care and enjoy your crafting!
Well, I didn’t do too well with keeping my Summer Craft Challenge posts up to date and consistent did I? Life got in the way and all of a sudden we’re over half way through September! So here is a whistle stop dash through the last 3 weeks of my summer craft challenge for 2023 because if I don’t post it, I’ll feel like I failed! I did, however post most days to Instagram so I’ll cut myself a bit of slack!
Here goes…
Week 4 : Saturday 12th August to Friday 18th August
This week began whilst still on holiday in Scotland (Glasgow to be precise) knitting socks, and after a long drive back home (without knitting or crochet that day) I ended up crocheting circles back at home in Manchester!
It was Granny Square Day on 15th August and I shared this Daisy Granny Square I designed while sitting next to some daisies beside the water in Argyll the previous week…
I hope to be sharing more about this square, along with some others I’ve come up with in the coming months.
Week 5 : Saturday 19th August to Friday 25th August
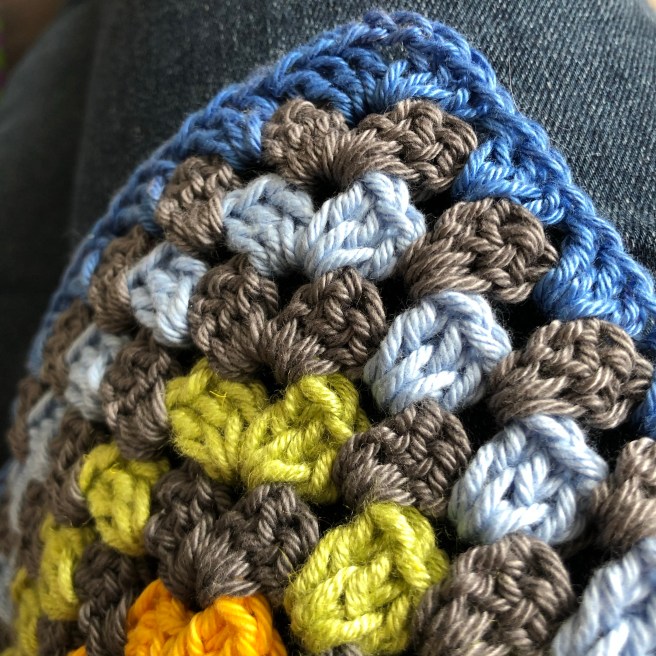
Work was nearing completion on my Potato Field Shawl this week including whilst watching the Lionesses in the World Cup Final. Plus I discovered this haul of Granny Squares when I opened a bag I hadn’t looked though for a while. I think I feel another project coming on!
Week 6 & a bit – Saturday 26th August to Tuesday 3rd September
And we made it! Schools went back for my youngest 2 on Wednesday 4th September – we survived the long summer break with creativity along the way. I also managed to completely finish my Potato Field Shawl. I’m really pleased with it. You can find the pattern details for it here my rainbow colours stripes were made with yarn bought at Yarndale last year from Cuddlebums Yarn.
By this point I had just turned the heel of the sock I was knitting – I’m pleased to say I got it finished in time for Eldest to take away to university with him. I used yarn by West Yorkshire Spinners in Peacock and followed Winwick Mum’s Basic Sock pattern. This is my third pair to date…. I know there will be more!
I’m not sure whether he’ll wear them in public but at least they’ll keep his feet warm in bed if he needs them!
Thanks for following me on my annual Summer Craft Challenge. It’s been fun and much needed respite in this my first summer ‘holiday’ back in structured employment. It’s been a juggle at times balancing work, children and sanity, but we just about got there. Creativity is almost always the answer for me when things get tricky – failing that there’s chocolate!
Well here we are again, in the midst of October and slowly inching towards the October half term holidays…. Roll on Monday and no early alarm!
I hope October’s been kind to you thus far. I have some news for you coming soon, but before then, here’s my Postcard from September. It was a busy month, but blimey it feels like a long time ago already! Here goes…
End of summer
The beginning of the month fell in the last few days of the school summer holidays. A group of friends from Youngest’s old primary school got together for a final hurrah before they went their separate ways to their new secondary schools. The venue for the meet up was Manley Mere Country Park in Cheshire.
It’s a super place with a huge lake for water sports, and an adventure trail which we went to….
There were tunnels, woodland walks…
…bridges…
….and lots and lots of mud. Thankfully we were forewarned and Youngest was dressed in old clothes – just as well as he went swimming in a pool of mud!! I think I’ve just about got him clean now!
New season of football… or not
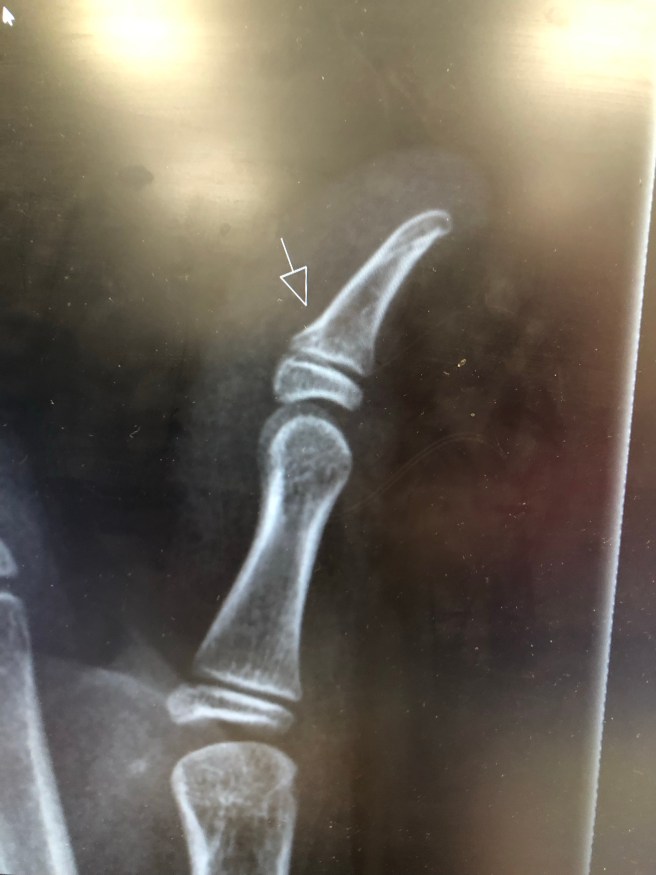
The football season got back into gear at the start of the month too with some pre-season friendlies and assessment matches but not for us. In his first week of school, Youngest managed to break a bone in his thumb whilst in goal playing football at school – not the most auspicious start to his secondary school career, although he was very proud of the fact he did save the goal in spite of the injury. No contact sport for 6 weeks meant no football of course. I’m pleased to say that the thumb is now healed and he has restarted PE and training at last.
Royal news
Of course last month was dominated by the news that HM Queen Elizabeth died, so it wasn’t your average September. When the Royal Proclamation was made in Manchester, I went along to witness history being made. I’m glad I was there.
Eldest off to Uni
September was also significant for us as Eldest flew the nest down south to University. I didn’t fancy my chances driving down to central London to drop him off, so we had to be packing ninjas and fit as much as we possibly could into suitcases ready for the train. I’m not sure how we did it but all bedding, pots and pans, food and clothes were squeezed in and we got him there! He got the keys to his accomodation on the evening before the Queen’s funeral – it was an auspicious time to be in London. I wrote a post about that time if you are interested in reading more, you can find it here.
Moody skies over Westminster as the people queued to see the Queen lying in state.
Once Eldest was safely ensconced in his lodgings I headed off for a walk to soak up a bit of the atmosphere and made it to Parliament Square in time for the National minutes silence. You could have heard a pin drop.
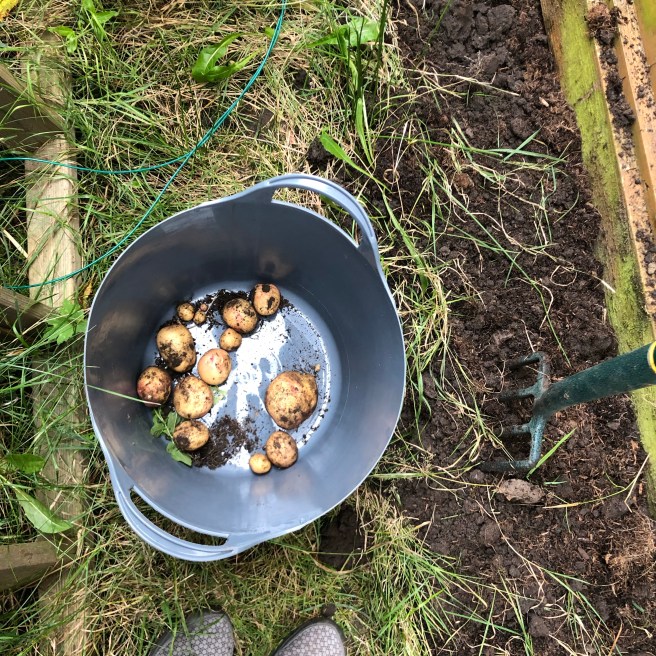
Spuds!
This was our second year in our ‘new’ home and the second year I have attempted to grown some food. I wasn’t quite as adventurous this time, just strawberries, cut and come again salad leaves and some potatoes. There’s a narrow strip of land behind our summer house and next to the back fence which isn’t really any use for anything. It doesn’t get much sun at all and is completely out of sight from the house. Last year I took a gamble and tried planting spuds there – it worked, although it wasn’t the largest of crops. I had another go this year and we enjoyed some lovely zero food miles potatoes with our dinner!Harvest time!
Happy birthday Yarndale!
I managed to get to Yarndale again this year in time for the festival’s 10th birthday and it was great fun. There was so much lovely yarn to squish and bucket loads of inspiration. It’s such a lovely festival. You can read all about my trip to Yarndale 2022 in this post.
One of the benefits of being out in the Yorkshire countryside while visiting Yarndale was that I was finally able to find the perfect spot to do a photo shoot with my latest Up the Garden Path dolls – Oakley the Acorn Tree Sprite and Agatha the Fly Agaric Mushroom. I may have had a few funny looks from passers-by but I don’t care! The light and location were perfect!
Podcast news
Making Stitches Podcast came back for a new series in September. The first episode featured my trip to Yarndale. You can listen to it here….
It would appear that I have let things slide somewhat with this blogging lark! Here we are in October and I’ve just realised I never actually officially ended my Summer Craft Challenge 2022 – that will never do!
So here, an awful lot later than previously intended, is the final installment of my Summer Craft Challenge….
Day 30 : Saturday 20th August 2022
First half of my main summer project completed – the beginning of the Dragonfly River MAL by Keep Calm and Carry on Crocheting & The Yarn Whisperer. I found the slub yarn really quite tricky to get to grips with to start with, but once I got into a rhythm with it, it was fine. Although, that said I am really looking forward to the next section as it is all in the gorgeous aqua blues of the accent yarn used in the accents of this section I’ve just completed.
Day 31 : Sunday 21st August 2022
Sewing in ends is right up there in my least favourite jobs alongside ironing I’m afraid, but I embraced it and felt very virtuous once all the loose ends were tidied away today. This means I can now continue with the rest of my cowl without a guilty conscience. What’s more I even got so into it that I actually revisited an old project (my Crochet Sanctuary Christmas 2020 blanket CAL) and finished off all the loose ends on that too!
Before…And after!Now both sides are respectable 😂
Day 32 : Monday 22nd August 2022
Back on the Granny Square bandwagon!
Day 33 : Tuesday 23rd August 2022
The Granny Square grows…
Day 34 : Wednesday 24th August 2022
No crochet as such for me, just some tech editing for my Oakley and Agatha patterns I launched earlier this week.
Day 35 : Thursday 25th August 2022
It may have still been the summer holidays but some things continue – like music lessons. So while number 2 son made music, I sat in the car and made amigurumi!
Day 36 : Friday 26th August 2022
Sadly there was no craft today – I was too busy packing the two youngest of the family off on a trip and packing for myself and Eldest to go on holiday too….
Week 6
Day 37 : Saturday 27th August 2022
Three train journeys gave me loads of time to get hooking. Lots of progress was made on my Dragonfly River MAL en route between Manchester and……. Paris!!!!!!
Day 38 : Sunday 28th August 2022
Too much sightseeing for me today to manage any more than a quick row before collapsing into bed!
Day 39 : Monday 29th August 2022
My last evening crocheting dragonflies in Paris.
Day 40 : Tuesday 30th August 2022
Crochet, orangina & a Brie baguette on the EuroStar très French!
Four train journeys today… 1 Paris Metro, 1 Eurostar, 1 Intercity between London and Sheffield and finally 1 Trans-Pennine Express from Sheffield to Manchester and home = lots of hooky time.
Day 41 : Wednesday 31st August 2022
No exotic location for my crochet today, just back on my sofa at home!
Day 42 : Thursday 1st September 2022
Back to in-car crochet during music lessons again.
Day 43 : Friday 2nd September 2022
Whoops I may have accidentally started a new project….
Day 44 : Saturday 3rd September 2022
Can you guess the theme of my newest creation?
Day 45 : Sunday 4th September 2022
More pumpkin crochet for me – this time alfresco at a football match. It was a pre-season friendly which ‘we’ won 3-0!
And that brings my Summer Craft Challenge to an end for another year. Thank you for joining me on another yarny summer adventure. I may not have managed a 100% record for doing something crafty every day this time, but I gave it a decent try.